
iAdaptAir ® – Troubleshooting Guide

Applicable for the following models (iAdaptAir®-S, iAdaptAir®-M, and iAdaptAir®-L.)
This troubleshooting guide will walk you through a series of function tests to ensure your iAdaptAir is operating at its maximum efficiency please follow each step in order for the best results.
Step 1
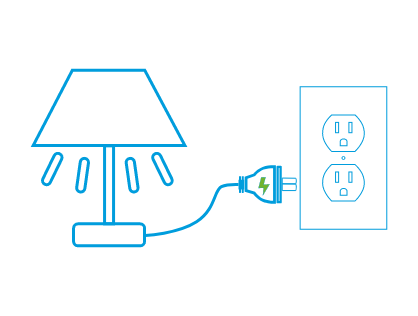
Verify power to the wall outlet.
Unplug the iAdaptAir and use any item within your home other than the Purifier to check if the wall outlet is powered. This will ensure the issue is within the iAdaptAir and not within the wall outlet.
Is the wall outlet powered?
Yes – Continue to step 2.
No – consult a qualified electrician to address issue with the outlet.
Step 2
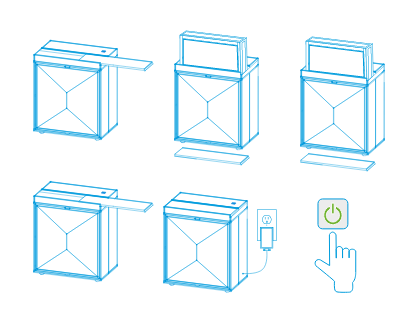
Plug in and power on iAdaptAir.
After verifying the wall outlet is operational grab the iAdaptAir and its power supply. Plug the power supply directly into the outlet. Insert the single pin connecter into the iAdaptAir ensuring that there is no obstruction or resistance preventing insertion. Using the unit control panel (located on top of the unit) press and release the Power Icon Button to turn the unit on.
Did the iAdaptAir turn on?
Yes – Skip to step 4.
Yes, but only the fans are working - Submit Warranty Claim
No – Continue to step 3.

Step 3
Reset filter bypass switch.
The iAdaptAir is equipped with a filter bypass switch that will prevent the purifier from turning on if a filter is not installed. To check if this is the issue pull the filter out and re-seat the filter into its housing.
- Open the filter cover by sliding it to the right.
- Lift the filter up 4-6 inches from within the housing.
- Re-seat the filter back into the housing to reset the filter sensor.
- Close the filter cover.
- Using the unit control panel (located on top of the unit) press and release the Power Icon Button to turn the unit on.
Did the iAdaptAir turn on?
Yes – Proceed to step 4
No – Submit Warranty Claim
Step 4
Cycle through each power option.
Pressing the power button multiple times allows the user to control which functions of the iAdaptAir are on and off. For this step we need to ensure all of the individual technologies within the iAdaptAir are functioning properly.
- 1st press turns on the unit, ionizer, UV light and low fan speed.
- 2nd press turns off the ionizer.
- 3rd press turns off the UV light.
- 4th press keeps the UV light off and turns ionizer on.
- 5th press switches the unit to standby mode.
All 5 features operated correctly?
Yes – Continue to step 5
No – Ensure Sleep mode is disabled.
Still not working? – Submit Warranty Claim
Step 5
Test fan speed options.
Pressing the Fan Speed button multiple times allows the user to manually control the fan speed of the iAdaptAir. For this step we need to ensure all three speeds are functioning properly.
- Default fan speed is Low.
- 1st press changes fan speed to medium.
- 2nd press changes fan speed to high.
- 3rd press changes fan speed back to low.
All 3 fan speed modes operated correctly?
Yes – Continue to step 6
No – Ensure Smart Mode and Sleep mode are disabled.
Still not working? - Submit Warranty Claim
Step 6
Test for Noisy / obstructed fan
To troubleshoot a noise within the iAdaptAir fan/s first ensure that the Fan speed mode is set to high position. Does it sound as if anything is blocking the fan from spinning or the fan/s are creating a louder than normal noise? (Note – The fans cannot be seen during operation as they are behind the filter.)
Troubleshooting Steps:
- Shut off the iAdaptAir.
- Remove the filter cover by sliding it to the right.
- Pull up and remove the filter from of the filter housing.
- Place your hand into the filter housing and press on the back of the dust screen to pop it out,
- Visually inspect fans for debris that may be causing the noise.
Did this resolve the noise?
Yes – Continue to step 7
No – Submit Warranty Claim
Step 7
Test sleep mode options.
Press and hold the lock icon until you hear a single beep, signifying Sleep Mode has been activated. Once activated two things will occur:
- the iAdaptAir control panel will lock and no setting can be modified.
- The LED lights on the top of the iAdaptAir will dim.
When in sleep mode you cant change settings but if you tap any button on the control panel the current settings will temporarily illuminate and then dim.
Press and hold the lock icon again to disable sleep mode.
Sleep Mode is working correctly?
Yes – Continue to step 8
No – Submit Warranty Claim
Step 8
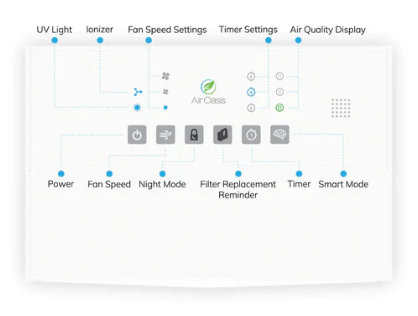
Inspect filter indicator lights.
The iAdaptAir filter replacement indicator informs the user of remaining filter life. You will have one of the following options:
For iAdaptAirs purchased before 2021
Above 70% filter life remaining – Green
Above 40% filter life remaining – Blue /Purple
Less than 25% filter life remaining - Red
For iAdaptAirs purchased after 2021
More than 75% filter life remaining – No Color
75% filter life remaining – Green
50% filter life remaining – Blue/Purple
Less than 25% filter life remaining – Red
Have you recently replaced the filter but the indicator is still reading red? > Press and hold the reset filter icon to reset the filter indicator light.
Filter life is displaying correctly?
Yes – Continue to step 9
No – Submit Warranty Claim
Step 9
Test automatic timers.
The iAdaptAir is equipped with an auto timer function that allows you to cycle between three preset timers of 2 hour, 4 hour, and 8 hour increments.
- No timer is set by default
- 1st press changes timer to 2 hours.
- 2nd press changes timer to 4 hours.
- 3rd press changes timer to 8 hours.
- 4th press shuts timer off.
Auto Timer is working correctly?
Yes – Continue to step 10
No – Submit Warranty Claim
Step 10
Test smart mode feature.
While in Smart Mode, the fan speed will automatically adjust according to your air quality. If the iAdaptAir® senses a reduction in air quality, the fan speed will automatically increase. When the air quality improves, the fan speed will automatically decrease to extend filter life.
- Press the smart mode button to activate smart mode.
- Cycle between the On/Off option by pressing the icon listed above to ensure operation of smart mode is successful.
Smart Mode is working correctly?
Yes – Continue to step 11
No – Submit Warranty Claim
Step 11
Ask a professional.
If you have made it to this point and your issue was not identified or rectified please contact the Air Oasis Customer Excellence Team via one of the two oprions below:
806-373-7788 or Submit Warranty Claim